Synora Engine
Summary
A 3D game engine being developed for a to-be-announced game.
It currently exposes a forward physically-based renderer, asset manager, scene manager,
flexible input system, and an ECS system on top of EnTT. The engine is being designed
such that the C++ API can be used directly for games by linking it as a static library. However,
there are plans to build a dedicated level-editor, and implement a scripting interface which would
offer the traditional engine experience.
It is currently closed-source, but there are plans to open-source in the future.
The Renderer
This project is being developed with 2 other programmers at the moment. At the start of the project, they opted to write a Vulkan renderer primarily with the goal of speed, and practicing more modern rendering techniques. I’m not familiar with Vulkan yet, so I decided to write an OpenGL renderer because I was familiar with OpenGL, and I believed I could forge ahead with rendering features quicker because I didn’t have to worry about the lower level details that Vulkan requires you to be explicit about.
OpenGL vs. Vulkan
One of the issues we identified with trying to support both a Vulkan and an OpenGL backend was that it was very hard to make a reasonable interface that makes switching between the different renderers easy. This is mainly because a sensible Vulkan design is very different from a sensible OpenGL design; we wanted to be able to design our respective renderers in a way that made the best sense for our given APIs.
Supporting both?
Instead of trying to match the OpenGL API, and the Vulkan API, I instead thought about abstracting at a higher level. Some of the key differences between both renderers were the way they defined key GPU resource types, the way they managed those resources, and the way they sent out commands to the GPU.
The main similarity, though, was that they needed to take some scene description given by the user, and they needed to produce an output of that scene.
The consequence of the approach I’ll describe below is that we can go ahead and build our own implementations and designs so long as it produces a reasonable output for the given scene description. And, scene descriptions don’t and shouldn’t depend on any graphics API internals.
The downside, though, is that the implementations and features supported ARE different. If I wanted to implement shadow mapping, then I’d need to implement it in both the Vulkan renderer, and the OpenGL renderer. It’s not something I can write once, and expect to work on every single rendering backend we plan on supporting.
As of right now, the OpenGL renderer supports more features than the Vulkan renderer. If I made a game and did the development using the OpenGL renderer, then I can expect the game to look very different when switching to the Vulkan renderer.
Also, the Vulkan renderer’s progress has stalled since my teammates have gotten busy, and it hasn’t yet implemented the IRenderViewBackend I’m about to describe. So, the flexibility benefit is all theory at the moment.
Enter: The IRenderViewBackend
Here’s a snippet of the interface which I shortened for this demonstration:
class IRenderViewBackend {
  public:
    IRenderViewBackend() = default;
    virtual ~IRenderViewBackend() {}

    virtual void init(class EngineContext *context) {}
    virtual void shutdown() {}

    virtual void beforeDraw() {}
    virtual void afterDraw() {}

    virtual void beginFrame(const RenderView3D &sceneDescription) = 0;
    virtual void draw(const DrawOptions &options) = 0;
    virtual void endFrame() = 0;
};
When rendering a scene with an IRenderViewBackend, you just do something like:
  renderer.beginFrame(RenderView3D::fromScene(&mainScene));

  // DrawOptions specifies a specific camera, render target, and "render effect".
  // You can think of a render effect as a pass to a multi-pass system.

  // The main thing is that you establish the scene's contents in a frame
  // and then you can draw that same scene multiple times using different
  // cameras, render passes, and render targets.

  renderer.draw(...);
  renderer.draw(...);
  renderer.draw(...);

  renderer.endFrame();
The actual Application core which contains all the different subsystems of the engine will also
be responsible for setting the IRenderViewBackend. But hopefully you can see how the interface doesn’t really depend on any API specific definitions, but rather just on a neutral scene description. This interface’s design does add some constraints to how the actual rendering
implementation can be designed. For example, all renderers implementing this interface must be designed so they produce the correct outputs when called in the order of beginFrame, draw, endFrame.
In my own experience of fitting my OpenGL renderer to this interface, I’m still pretty flexible in the way I’m building my draw command lists, and running my rendering passes. In fact, the interface you see above describes nothing about how the OpenGL renderer actually works. I believe that if I asked you to guess which specific API the backend is running on, you wouldn’t have a clue. And it could even be plausible, in my opinion, to say that this could be writing an ASCII representation to a text file. We don’t care about how it renders the scene, we just care that it does.
RenderView3D
Just to hammer the system home, we do need to talk about this RenderView3D which contains API-neutral data describing a scene. It looks something like:
struct RenderView3D {
  std::vector<UUID> models;
  std::vector<uint64_t> layers;
  std::vector<BoundsView> bounds;
  std::vector<glm::mat4> transforms;
  std::vector<MaterialView> materials;
  std::vector<AnimationView> animations;
  std::vector<CustomRenderDataView> customRenderData;

  static RenderView3D fromScene(class Scene *scene);
};
You might be wondering where the environment information is (like skybox, post processing, etc.), but
the truth is I’m just casting the IRenderViewBackend to my OpenGLRenderer to set the environment information in the way my renderer handles them. This is because I haven’t yet decided exactly how an environment should be represented generally.
At a minimum every “entity” to be rendered in a scene requires a model, and transform. Everything else would contain an index into the model list because not every model will have an animation attached, for example. But the animation should know which model it’s attached to.
The Asset Manager
The goal of the asset manager is simple: flexibility. I should be able to define any resource type and register it easily. The initial design of an asset manager used a variant to define all registered asset types. The problem was that there are a lot of different types of assets, and if you ever implemented a new type then you would have to update the variant (which is growing quite large) and perhaps all the paths that check (or run through) that variant must be updated to support the case of the new asset type.
Register at runtime
I don’t dabble with templates too much, but they turned out to be really useful for this system. The
AssetManager looks something like (I really really shortened this):
class AssetManager {
public:
    template <typename PoolT> void registerPoolName(std::string_view poolName);
    template <typename AssetT, typename ImporterT> void registerImporter();

    template <typename AssetT> const AssetT *get(UUID id) const;
    template <typename AssetT> AssetT *getMut(UUID id);

    template <typename AssetT> UUID add(AssetT asset, std::string_view customKey = "");

    template <typename AssetT> std::optional<AssetT> loadAsset(std::filesystem::path path);

    AssetRef acquire(UUID id);
};
Above, I’m showing what I believe are the necessary functions to understand how this system works. A pool just stores all assets of a specific type directly (contains all the objects). An importer defines the exact implementation of how an asset should be loaded when you call loadAsset.
Every asset has a UUID to differentiate between them, and to access them when calling get or getMut.
If you want to add a new asset (something that might be loaded from a file), then you just define the structure of that asset, an importer that parses the asset file into that asset structure, and that’s it! You don’t even have to create a pool because a new pool is created every time the AssetManager runs into an asset type it doesn’t have a pool for. Some assets might not ever be loaded from a file, but rather exist only as resources in code. In this case, just call add directly to store the data in the AssetManager (what loadAsset uses to store the loaded asset in a pool).
The AssetRef refers to a reference-counted asset. It just contains the UUID of the specific asset, and then updates the UUID to reference count map whenever it’s created, copied, moved, or destroyed. It’s useful for automatically cleaning up resources the moment a specific asset is no longer being referenced anywhere.
Shadow maps
I once read somewhere that shadow maps are “the gift that keeps on giving”. And, that sentiment really couldn’t be more accurate. Shadows simultaneously improve the quality of your scenes while making them look worse because of all the edge cases and artifacts you have to deal with.
This definitely deserves a writeup of its own in my blog, but I’ll explain the solution really simply, a really annoying edge case I dealt with, a fix I made, and some pictures of the end result!
If you have a light source, let’s say a directional light, then you want to render the scene from that light source’s point of view. This is because any object, or point on an object that the light doesn’t directly see is in shadow because light doesn’t hit it.
This involves computing a light space matrix, transforming the scene into light space, and rendering it into a depth map. Then, you sample that depth map (called a shadow map) in the fragment shader by transforming the current fragment’s position by the same light space matrix you used to generate that specific depth map, converting the light space coordinates into NDC via perspective divide (and then remap to [0, 1] for texture coordinates), sampling the texel corresponding to that coordinate, and comparing the stored depth with the fragments current z-coordinate. You can then tell if the current fragment is behind another that the light can see and shade accordingly.
Implementing it like this leads to an artifact known as shadow acne:

The problem is caused by multiple fragments sampling the same value in the depth map. The first common fix is just adding a constant bias to the sampling point so fragments don’t sample the same point. It fixes the problem, but depending on how large you made the bias, it introduces a new problem known as peter-panning. It’s named so because Peter Pan’s shadow at one point moved on its own, and was no longer Peter Pan’s actual shadow (I love that they named it because of this). Similarly, you can offset an object’s shadow too much to the point it doesn’t actually look like the object is casting the shadow.
My fix to both of these was using hardware slope scaled bias as suggested by Microsoft in this article: Common Techniques to Improve Shadow Depth Maps. Instead of a constant bias, you scale the bias based on the surface’s normal relative to the light. A surface being hit head-on by a light shouldn’t have any bias while a surface being hit at a more perpendicular angle should have a large bias.
There’s a lot more problems I dealt with that turned this into a half-month project, and I ended up with a result I’m somewhat satisfied with (the gift that keeps on giving). Again, this all deserves its own writeup in my blog, but I’ll briefly mention that I ended up implementing cascaded shadow maps because of a problem known as perspective aliasing (blocky shadows).
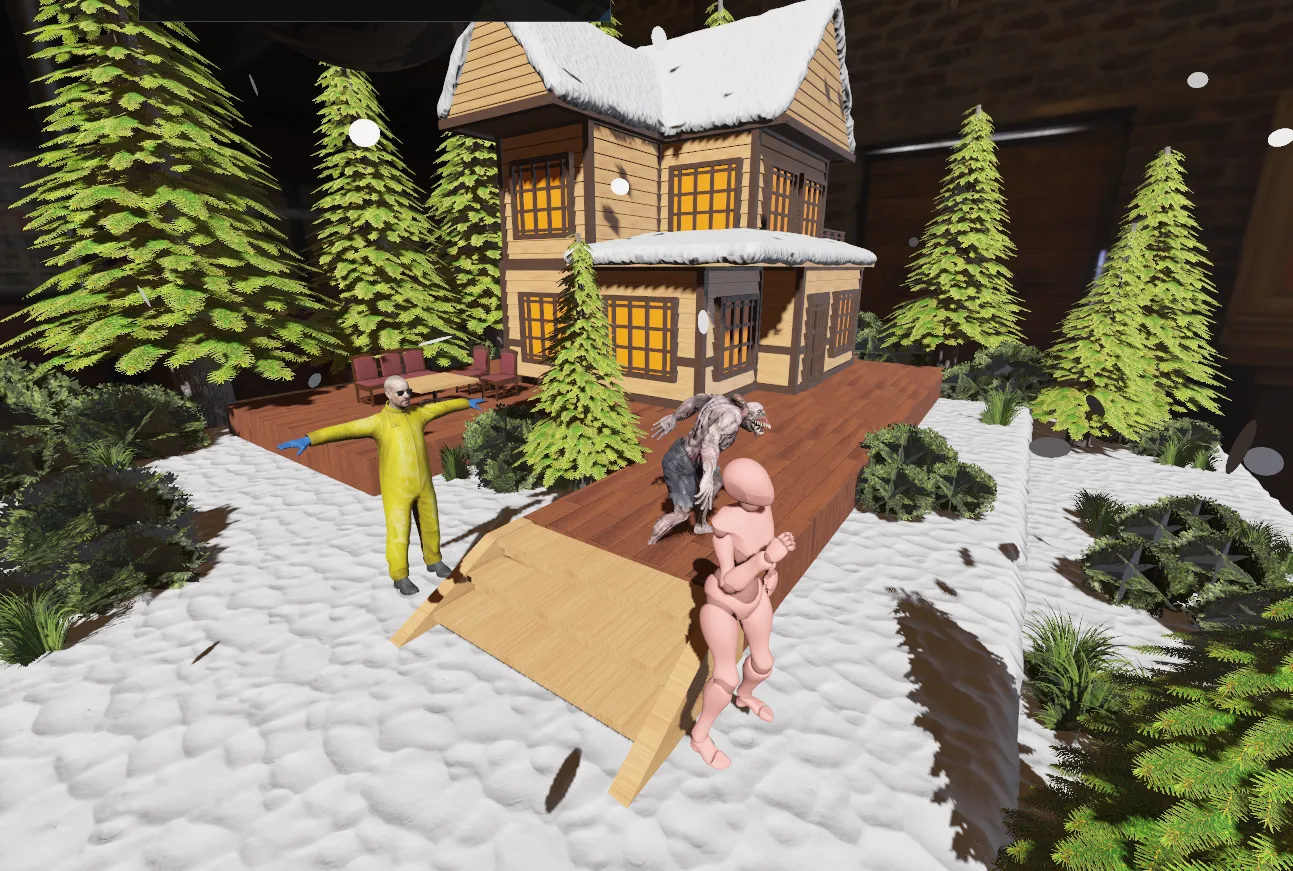
Here’s some cool renders with shadows:
Trees and foliage casting shadows:

If you look closely in this second scene, you can see crosshatching between cascade layers here. It compensates for resolution differences between layers (nearer layers render at a higher resolution while farther layers render at a lower resolution). Wider view of the same cabin scene:

Shadows paired with an actual environment map:
